
How to build a loan application using MySQL in DronaHQ
DronaHQ is a modern AI low-code platform that empowers teams to build internal tools, apps, and workflows with powerful backend logic and UI design, all without requiring any coding expertise. Whether you’re working with REST APIs or databases like PostgreSQL or MongoDB, DronaHQ makes it seamless to connect, fetch, and manipulate data visually.
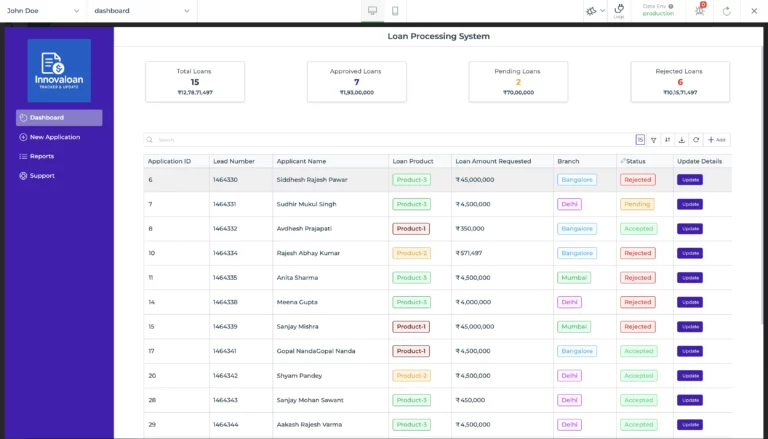
In this loan processing application, we will build a comprehensive dashboard that displays data from a connected MySQL database. The dashboard will include a dynamic table to track the status of loan applications, whether they are accepted, rejected, or pending. Users will be able to view and update their loan status through a pre-filled form with existing data.
Additionally, we will implement a smart EMI calculator that computes the monthly instalment based on the loan amount and duration. The app will also include features to add new loan entries using a multi-tabbed form that captures applicant details, allows document image uploads, and performs Aadhaar verification, creating a seamless and efficient loan processing experience. All of this is built using DronaHQ’s powerful low-code tools.
Step 1: Plan your app UI
Before building the app, it’s essential to take a step back and plan things out. Think about what kind of data you want to store in your database and what you want users to see in the app. Sketch out how many screens or tabs you’ll need, and decide what each one will do, like which tab shows the loan list, which one handles new entries, and so on. Having this clarity upfront makes the whole process smoother and helps you build a more intuitive app.
If you’re looking to get the user experience right from the start, read our Internal tool UX design guide.
For this loan application, we’ll keep things simple and clear with two main screens. The first screen displays a dashboard with a table showing loan entries, along with key status indicators indicating the number of accepted, rejected, and pending loans. The second screen will have two tabs: one for updating existing loan records using a pre-filled form, and another for a smart EMI calculator that helps users estimate monthly payments based on the loan amount and tenure. This structure keeps the app user-friendly.
Want to ensure your tables are clear and actionable? Check out our guide on Table UI design best practices.
Step 2: Integration MySQL database
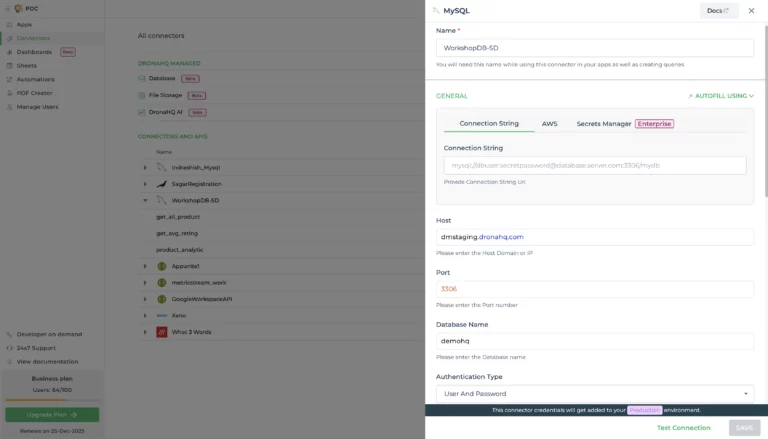
Once you’ve logged into your DronaHQ account, the first step is to create a MySQL connector. Head over to the Connectors section, click New Connector, and choose MySQL. To connect it with your pre built MySQL database, you’ll need to fill in some key details like –
- host
- port number
- database name
- username
- password
If you prefer, you can also use a connection string to autofill everything in one go. Not using MySQL? No worries, DronaHQ supports a wide range of data sources, including MongoDB, PostgreSQL, Firebase, and even Google Sheets. And if you’re working with a custom backend, you can opt for the REST API connector to hook up your own APIs.
You’ll also see a few options just above the “Test” button about how you want to connect, whether it’s by whitelisting IPs, using SSL, or a dynamic host setup, and more. DronaHQ has detailed documentation on all of this – DronaHQ Docs, so feel free to explore that if needed. For this Application, we’ll go ahead with a direct MySQL connection to keep things simple.
Step 3: Create an app using a template

Once your database connection is successfully set up, it’s time to start building your app. You’ll begin by creating a new app and designing its user interface. DronaHQ offers multiple ways to do this, depending on your preference:
- You can manually drag and drop UI elements to design your layout from scratch.
- Or, if you have an image or Figma file ready, you can simply upload an image into the AI Chat, and it will generate the interface for you automatically.
- The fastest and easiest method, and the one we’ll use in this guide, is to choose from a library of pre-built templates under the “Select Ready Template” option.
DronaHQ offers a wide range of templates to get you started quickly, so you don’t have to build everything from zero. Just pick the one that fits your use case and start customising!
Step 4: Create multiple screens and a menu bar
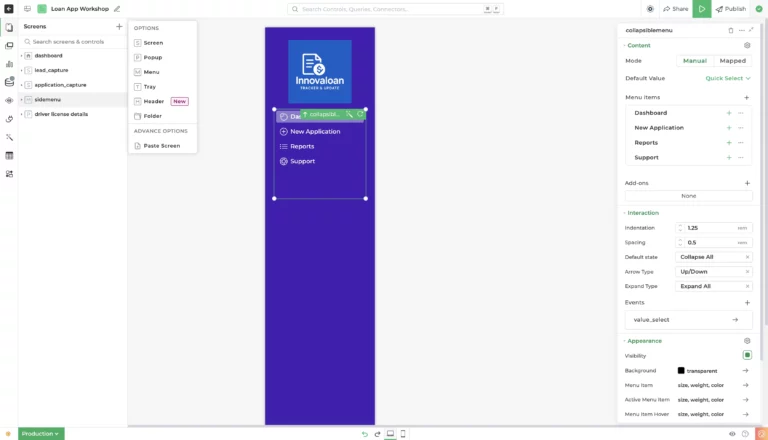
After setting up the home screen, the next step is to create the rest of your app’s screens and a menu to move between them. In DronaHQ’s Screens section, you’ll find options like –
These can be added to any screen and reused wherever needed.
In our case, we’ll create a menu bar that shows up across all screens. This will help users easily switch between the dashboard, update form, and EMI calculator.
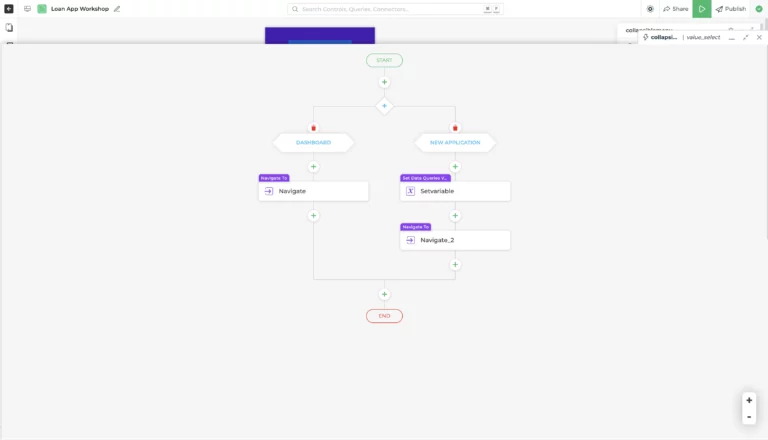
You can set up the navigation logic directly from the Properties panel, under the Events section. Simply define actions, such as “navigate to another screen,” when a menu item is clicked.
Step 5: Bind the table with a MySQL query
To display data in your table on the home screen, you need to bind it to the MySQL query that we set up earlier using the connector. This is how your app pulls real-time data from the database and shows it on the screen.

Select table -> Quick Select -> Connector Query -> Select Connector -> Write your query
You have two options here:
- You can write your own SQL query,
- Or use the “Ask AI” feature to auto-generate the query for you.
For example, a simple query like:
SELECT * FROM lead_capturewill fetch all the records from the “lead_capture” table and display them directly in your table component. “lead_capture” is the name of the table in our MySQL database.
From the properties section of the table, we will add an update button so that if any value needs to be updated, it can be done here.
And for each dashboard element, we will bind the data with the help of a data query we are using to insert the data into the table from the properties section.
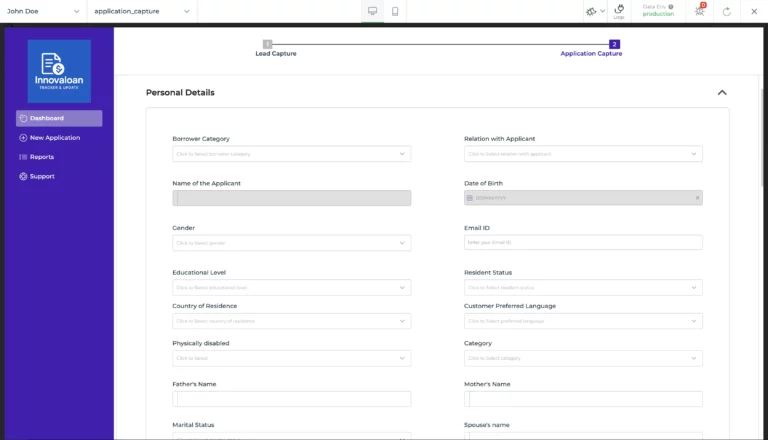
Step 6: Create a screen for updating the form
For the second screen of our app, we’ll organize the layout using a tabbed interface by selecting the Tab template.
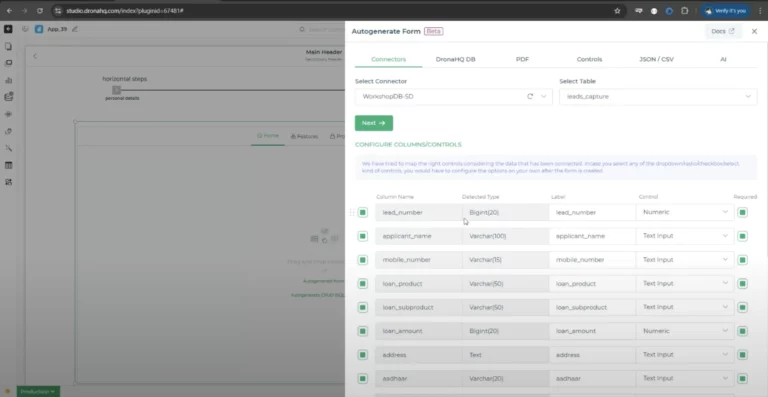
In the first tab, we’ll use DronaHQ’s Autogenerate Form feature. This smart tool automatically creates a form based on the columns in our database table. Once generated, we’ll bind the form fields to the data from the table, which allows the form to be pre-filled with existing values.
The best part is that the form remains fully editable, so users can easily update lead details. Once changes are made, the form can trigger an update query to reflect those changes in the database.
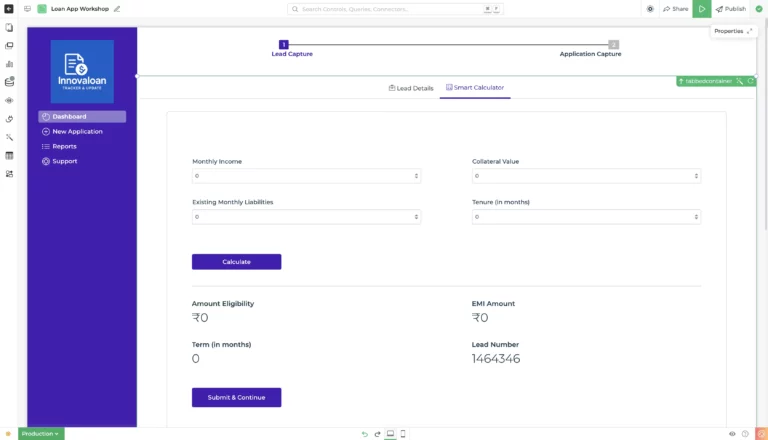
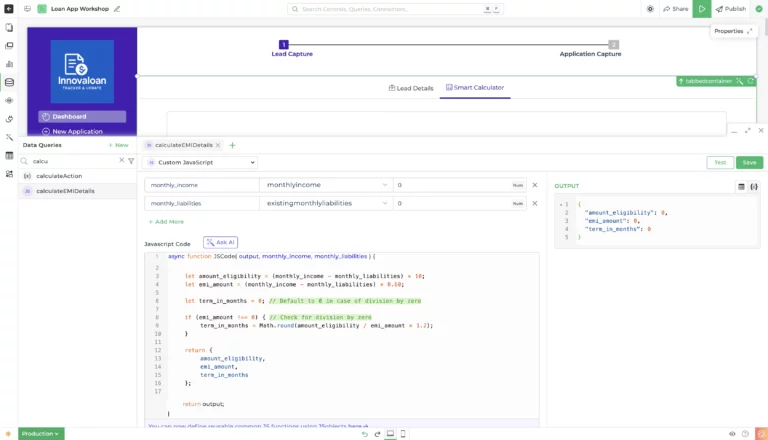
Step 7: Smart calculator
In the second tab of our screen, we’ll create a smart EMI calculator to help users quickly estimate their monthly loan installments. It’s simple to set up, just drag and drop two number input fields (for monthly income and monthly liabilities), add a button to run the calculation, and place a few text fields to display the results, as shown in the screenshot below –
Once the layout is ready, we’ll add a bit of JavaScript to make it functional. Here’s the logic we’ll use:
let amount_eligibility = (monthly_income - monthly_liabilities) * 10;
let emi_amount = (monthly_income - monthly_liabilities) * 0.60;
let term_in_months = 0;
if (emi_amount !== 0) {
term_in_months = Math.round(amount_eligibility / emi_amount * 1.2);
}
return {
amount_eligibility,
emi_amount,
term_in_months
};
This small script does the math for us, calculating how much loan a user is eligible for, what their EMI might be, and how long it could take to repay, on the basis of their monthly income, amount and tenure.
The results from this function are automatically shown in the text fields, giving users instant feedback as they enter their numbers. It’s a quick, user-friendly way to offer real-time financial insights right inside your app.
Step 8: Preview test publish
Once you’ve finished setting everything up, click the green Preview button in the top right corner. This lets you try out your app in real time, so you can see if the data is loading properly, make sure the screen navigation feels smooth, and double-check that the form rules and EMI calculator are working as expected. Take a moment to test everything thoroughly so you can catch any issues early. And once you’re happy with how it all looks and works, hit Publish to go live. Your app is now ready to be shared and used!

Final thoughts
There’s a lot more you can do to enhance your app based on your needs. You can add input field validations, apply custom rules, change the theme of your app, explore additional UI components, and implement custom logic to make the experience more interactive and user-friendly. It’s also a good idea to set up failure conditions to handle errors gracefully—for example, showing alerts when data fails to load or a form submission doesn’t go through.
You can refer to DronaHQ Docs to understand all these features in detail, so feel free to dive in whenever you’re ready to take things further.
What’s next?
Once your app is live, here are a few ideas to take it even further:
- Add login access for reviewers to manage who can view or update records.
- Track submitted loans with a charts widget to visualize approval rates, trends, and statuses.
- Send confirmation emails automatically using the Gmail connector.
- Implement role-based access control to restrict permissions based on user roles (admin, reviewer, etc.).
Related Articles

