

How to build a kiosk app using MySQL in DronaHQ | Step-by-step
A Kiosk app is a specialised type of application designed for touch-screen devices used in public spaces or retail environments. You’ve probably seen them in places like Apple stores, Nykaa outlets, or even at fast-food restaurants. These apps let customers easily explore products, read or leave reviews, and interact with the brand, all through a simple, touch-friendly interface on a tablet or kiosk screen.
They’re designed to be intuitive and visually engaging, helping businesses reduce the need for in-store staff while still providing a smooth, self-service experience.
DronaHQ is a modern, low-code platform powered by AI that helps backend developers and teams quickly build internal tools, dashboards, and full-fledged applications, all without requiring deep frontend expertise. Whether you’re working with REST APIs or databases like MySQL and MongoDB, DronaHQ offers visual connectors, drag-and-drop UI components, smart forms, role-based access control, and more. It’s designed to accelerate development while providing you with full control over logic and data.
What are we building?
In this blog, we’ll walk through building a Digital Product Review Kiosk App using DronaHQ. By the end, you’ll have a working kiosk-style app with:
- A product catalogue connected to a MySQL database
- Dynamic rating and review capability
- Dashboards showing total products, average pricing, and category trends
- A form tray to submit user reviews
- Email confirmation setup
- A sidebar with branding and menu navigation
- A customised visual theme
Step 1: Plan your kiosk app layout
Before jumping into building your kiosk app, it’s a good idea to take a step back and map out what the app should look like and how it should function. A little planning up front makes the whole process smoother and ensures the final app is easy to use.
Since kiosk apps are meant for walk-in users who won’t have anyone guiding them, the interface should feel natural, and the navigation effortless. Think about the kind of content the app will show, like product listings, ratings, or customer reviews. Consider the main actions users will take, such as viewing product details or leaving feedback.
Plan how many screens you’ll need and where elements like forms or extra information should appear, perhaps in side trays or pop-ups.
It’s also smart to think about components like a menu bar or logo placement that will appear across all screens to keep the experience consistent and polished.
Step 2: Connect to the MySQL database
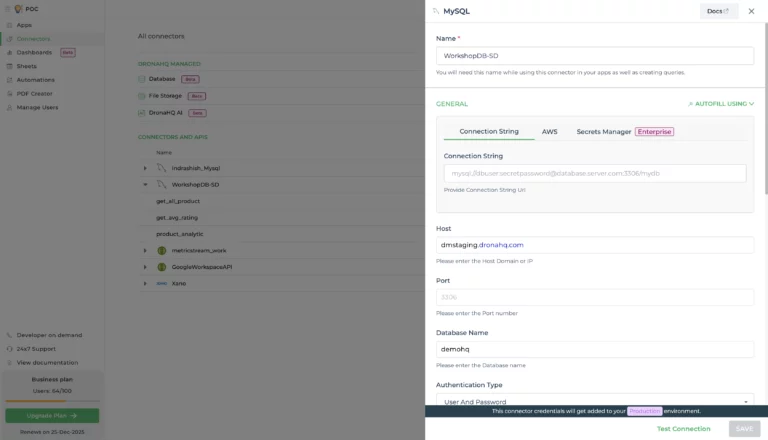
After logging into your DronaHQ account, the first thing you’ll do is set up a MySQL connector to pull in your data. Navigate to the Connectors tab, click on “New Connector”, and select MySQL from the list. You’ll be prompted to enter a few essential details, such as your host, port, database name, username, and password, to establish the connection. Alternatively, you can use a full connection string if you prefer to save time and complete everything at once.
If MySQL isn’t your database of choice, that’s fine. DronaHQ also works smoothly with MongoDB, PostgreSQL, Firebase, Google Sheets, and even custom APIs through its REST API connector.
Before clicking Test Connection, take a look at the extra settings available, like IP whitelisting, SSL mode, or using a dynamic host. These are useful for teams that require secure or custom configurations. DronaHQ also offers clear documentation in case you need help along the way. For this walkthrough, we’ll stick with a straightforward MySQL connection to keep things focused and easy.
Step 3: Create backend queries
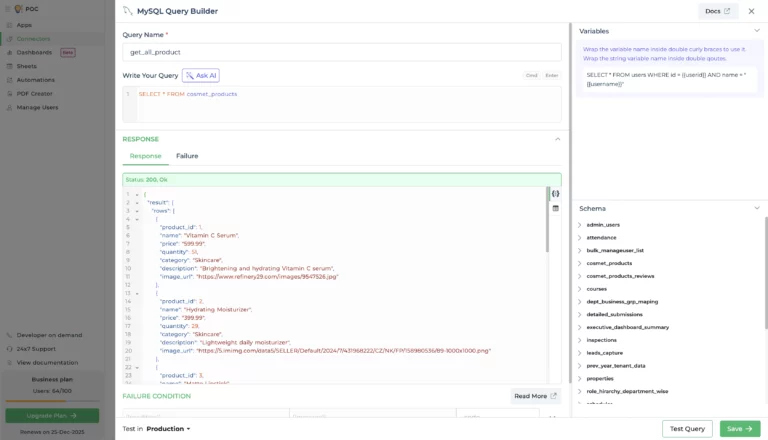
Now that your MySQL connector is ready, the next step is to create the backend queries that will fetch and process data for your kiosk app. These queries will be used to populate your table, calculate average ratings, and display analytics on the dashboard.
We’ll create three essential queries:
1. get_all_product: This query retrieves all product data from the database, which will be displayed in the main product listing table.
SELECT * FROM cosmet_products;
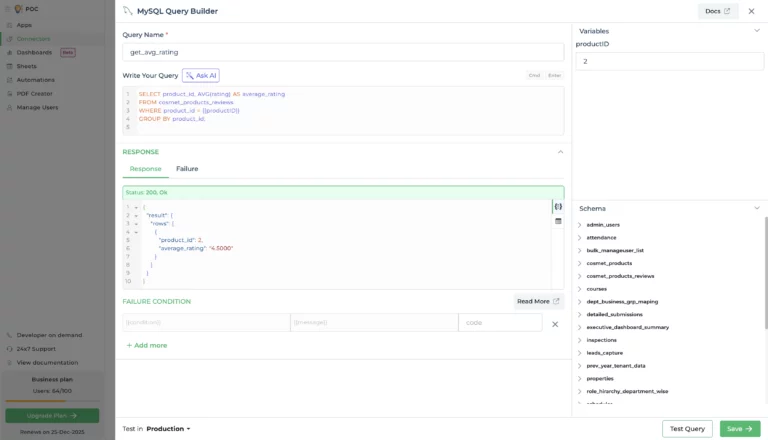
2. get_avg_rating: This query calculates the average rating for each product based on user reviews. To make this dynamic, we’ll add a variable called productID and pass it using the table’s selected product, like this: {{tablegrid8.product_id}}
SELECT product_id, AVG(rating) AS average_rating FROM cosmet_products_reviews WHERE product_id = {{productID}} GROUP BY product_id;
3. product_analytic: This query provides insights for the dashboard elements, including:
SELECT (SELECT COUNT(*) FROM cosmet_products) AS total_products_listed, (SELECT category FROM cosmet_products GROUP BY category ORDER BY COUNT(*) DESC LIMIT 1) AS most_populated_category, (SELECT ROUND(AVG(price), 2) FROM cosmet_products) AS average_product_price;
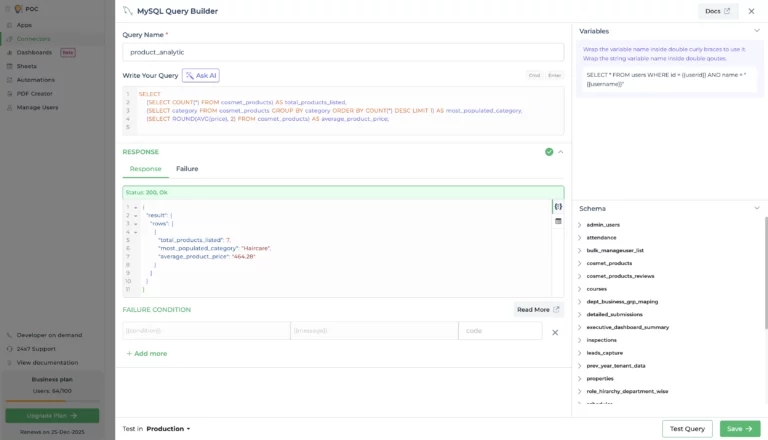
- Total number of products listed
- The most populated product category
- Average price of all products
Step 4: Use a template to build the UI
Once your database connection is set up and your essential queries are ready, it’s time to start building the actual app interface. In DronaHQ, you have a few different ways to create your UI depending on what works best for you.
You can go the traditional route and manually drag and drop components to build the layout from scratch. If you already have a design (like a screenshot or a Figma file), you can upload it into the AI Chat, and DronaHQ will generate the UI for you automatically, which is a real time-saver.
But to make things even easier, we’ll go with the fastest method: choosing a pre-built template. DronaHQ offers a range of ready-to-use templates under the “Select Ready Template” section. These templates are perfect for jumpstarting your app without building everything from the ground up.
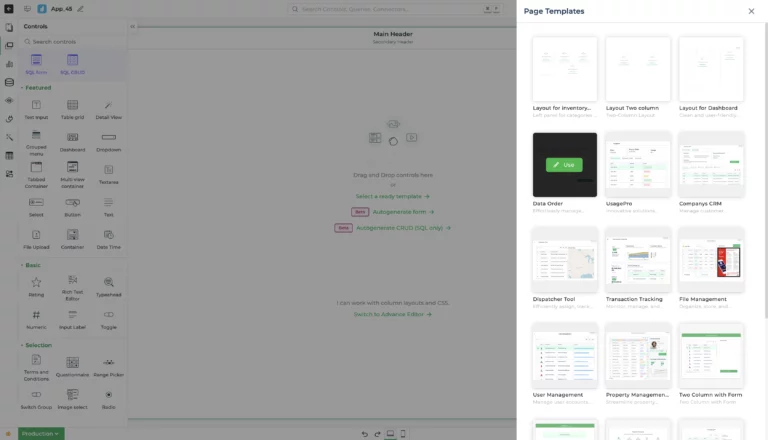
For this kiosk app, we’ll select the “Data Order” template. From there, we’ll make a few changes, removing any unnecessary components and adding useful elements like a detail view to display selected product info, and a review component so users can easily submit their feedback.
Step 5: Add menu and tray screens
After setting up the main home screen, the next step is to build the additional screens and design a smooth navigation flow between them. In DronaHQ’s Screens section, you’ll find reusable elements like
that can be added to any screen and reused across your app.
For our kiosk app, we’ll create a tray screen that slides in from the right whenever a product entry is selected. This tray will contain a simple feedback form where users can submit their reviews directly from the kiosk. It’s a sleek, non-intrusive way to collect input without leaving the main product listing.
We’ll also set up a menu bar that stays consistent across screens, allowing easy navigation between the product list, review form, and other sections. You can configure the navigation logic from the Properties panel under the Events tab by assigning actions like “navigate to screen” when a menu item is clicked.
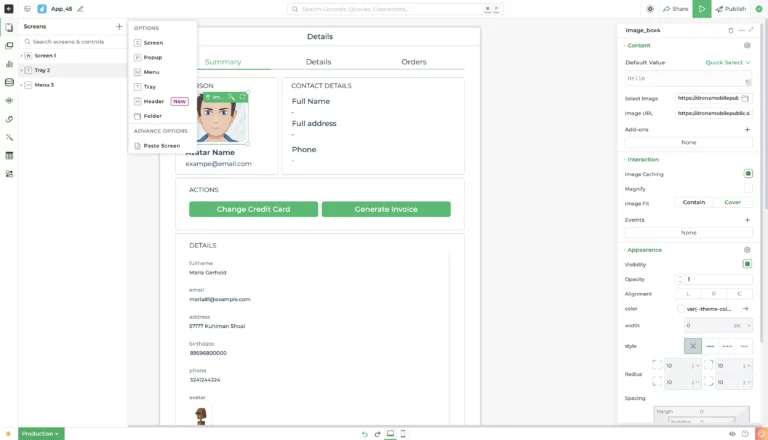
This setup ensures a smooth, touch-friendly experience for users interacting with the kiosk.
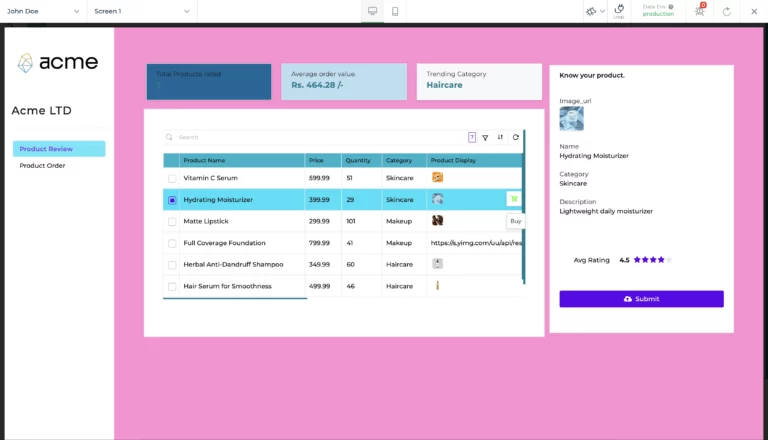
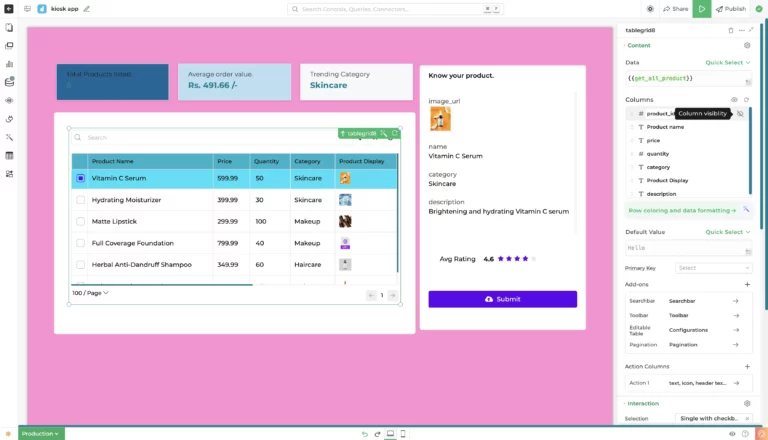
Step 6: Bind UI components to data
Now comes the most important step: connecting your UI with real data. To display products on your home screen, you’ll need to bind the table component to the MySQL query we created earlier. This ensures the table dynamically pulls and displays real-time data from your database.
Here’s how to do it in DronaHQ:
- Select the table component.
- Go to Quick Select > Connector Library.
- Choose your library and select the saved query: get_all_product
This query retrieves all records from the “cosmet_products” table.
Once connected, the table will automatically display the data. If needed, you can use the built-in JavaScript transformation option to filter or format the data before rendering it.
In the Properties panel, choose the columns you want to display. For this app, we’ll include:
- Product Name
- Price
- Quantity
- Category
- Image
- Description
Additionally, we’ll add a Buy button in the last column to allow users to initiate actions directly from the kiosk.
Next, we’ll bind this data to the detail view on the right-hand side. This component will reflect the selected row from the table. To do that, use the following binding:
To show the average rating, connect the get_avg_rating query and bind its result to the rating component.
And finally, for the dashboard widgets, we’ll use the third query “product_analytic” to show:
- Total products listed:
{{product_analytic.total_products_listed["0"]}}- Average product price:
{{product_analytic.average_product_price["0"]}} /-- Most populated category:
{{product_analytic.most_populated_category["0"]}}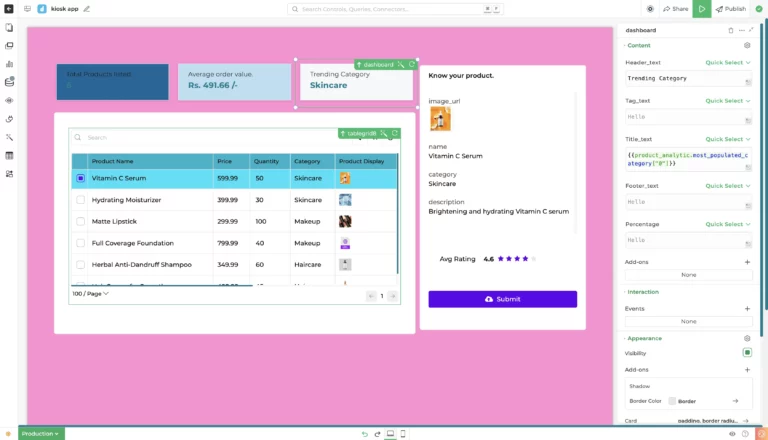
With this setup, your kiosk app will be fully wired to live data, providing a responsive and informative experience for users.
Step 7: Design the feedback tray
In this step, we’ll create a feedback submission form using DronaHQ’s “Tray with Tabs” template on our tray screen. This tray will act as a slide-out form when a user selects a product from the main screen.
The tray consists of three containers, each serving a different purpose:
- Product Display:
The first container will show the selected product’s image and name. We’ll bind this data using the main query “get_all_product”, so it dynamically reflects the chosen product.
- User Info Section:
The second container allows the user to enter personal details. These fields can be generated automatically using the Autogenerate Form feature, making it quick to set up. - Feedback Form:
In the third container, the user can submit their review. This section will include:
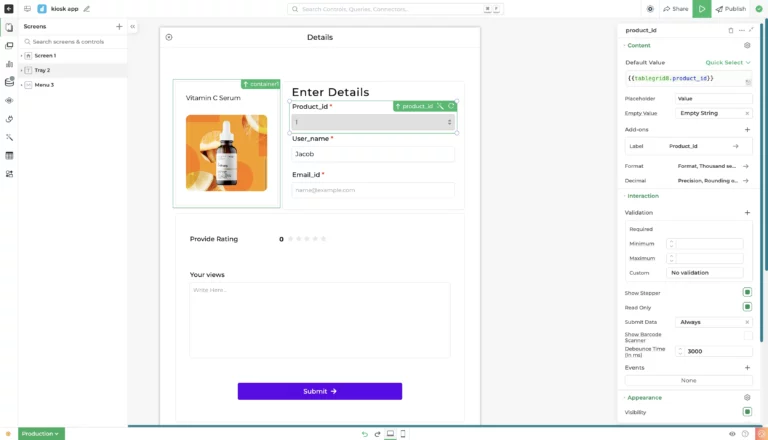
- A star rating input
- A textarea for feedback or comments
These inputs are also built using Autogenerated Forms, which pull the structure directly from your database schema.
At the bottom of the tray, you’ll see a Submit button that handles the entire data flow. When you double-click this button, DronaHQ opens an editable Action flow. This typically includes:
- Field validation to ensure all inputs are correct
- A Trigger Data Query that inserts the review into your database
- A toast notification to show success or failure messages to the user

This flow ensures a smooth user experience and accurate data collection, all within a visually organised tray.
Step 8: Preview, test, and publish
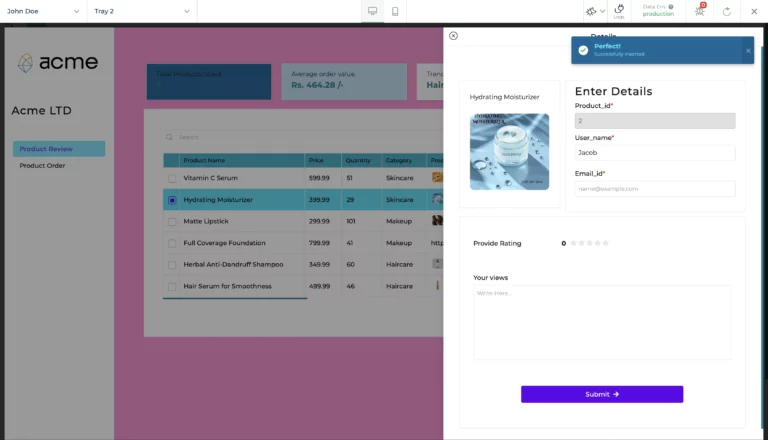
Now that your kiosk app is fully set up, with a table view pulling live data from your MySQL database, a feedback form for users to submit their reviews, and dashboard components that highlight key product details, it’s time to test everything.
Head to the top-right corner of the builder and click the greenPreviewbutton. This opens a live preview of your app, allowing you to interact with it just like a real user would.
Here’s what to check during preview:
- Is your product table displaying data correctly?
- Are product details and average ratings loading properly when a product is selected?
- Does the feedback form slide in smoothly and accept input?
- Are the submit buttons working and showing toast notifications?
- Is the dashboard showing accurate analytics (like top category and average price)?
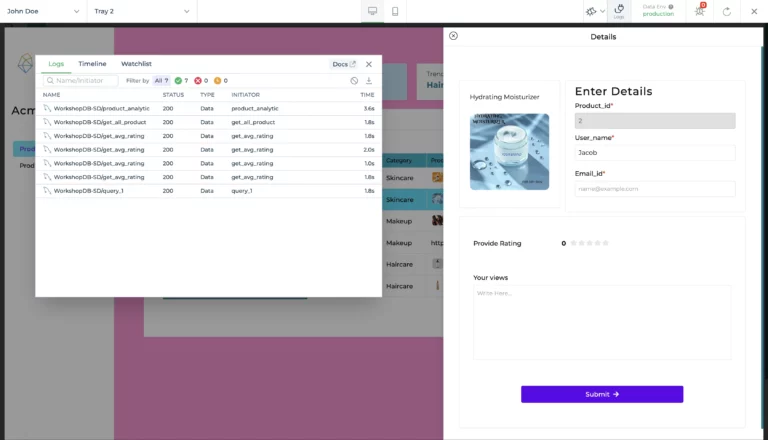
You’ll also see a log panel at the top of the screen that helps you track real-time status messages, helpful for debugging and making sure all backend actions are running as expected.
Once you’re confident that everything is working smoothly, hit the Publish button. DronaHQ will generate a shareable link you can use to launch the app on your kiosk devices or share it with your team.
Step 9: Apply a custom theme (optional)
While building this kiosk app, I used a custom theme to better match the branding and design style I had in mind. DronaHQ gives you the flexibility to choose from built-in themes like Brand, Dark Mode, or Light Mode, or you can create your own custom theme from scratch.
To customise your theme, go to your DronaHQ Studio home page, click on your profile in the top right corner, and select Account Settings. There, you’ll find the Theme Configuration option. Once inside, you can explore several pre-made themes or use the blank template to design your own using various colour and style options.
Custom theming is totally optional, but it’s a great way to make your app visually consistent with your brand or personal aesthetic.
What’s next?
There’s a lot more you can do with this app!
- Add login access for reviewers.
- Track submitted reviews using the Charts widget
- Trigger confirmation emails with the Gmail connector
- Set up failure conditions to gracefully handle submission or DB errors
- Build conditional visibility rules, add client-side validation, or logic branching in workflows
All of these features are well-documented in DronaHQ Docs.
Final thoughts
Kiosk apps don’t have to be complicated or time-consuming. With platforms like DronaHQ, backend developers can now create a polished, production-grade UI with full logic and data binding in a matter of hours, no need to wrestle with HTML, React, or CSS frameworks.
So the next time your product team asks for an in-store kiosk, you know what to do.
If you’d like to try this yourself, sign up on DronaHQ and follow this guide — or better yet, watch the full workshop here and build alongside.