Integrating Twilio with DronaHQ
Integrate Twilio to set up communication strategies and interact with your customers. Connect Twilio to the low-code apps with ready connectors to send and receive text messages, and perform other communication functions and engage with your customers.
You can make use of Twilio Integration to send SMS messages, WhatsApp Text, and Media messages to your customers and prospects and other such scenarios.
Configuring Twilio connector
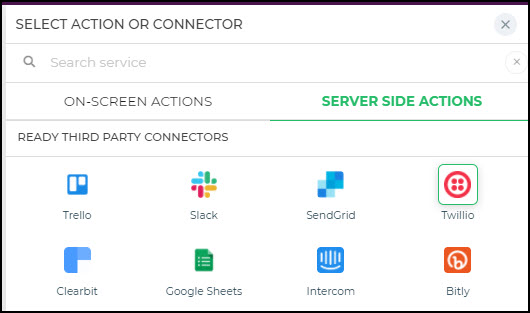
The Twilio Third Party connector is available under Connectors. Let us see how to configure it.
- In case you are using Action flows, then under On-Screen Action select Twilio and click Continue.

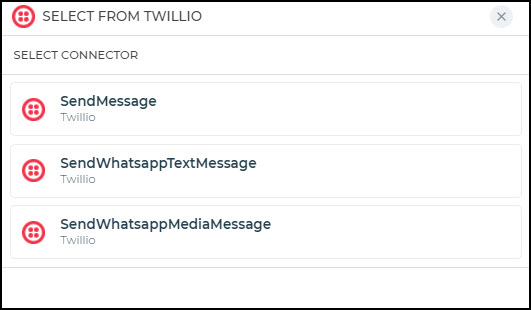
- Select the necessary function from Twilio and click Continue.

- Now you need to add the Twilio Account to Authenticate Twilio. For this, you need to first configure the account and then proceed. Once all details are added, click Submit. Your connector account configuration is now done.
- If you have already configured your account, you simply need to choose it from the list and click Continue.
- Now Configure connector fields. Add a Connector name. Then add the necessary Fields for the connector and add return values if any. Add the unique name and click Finish.
Using Twilio connector
Now let us consider a few scenarios to understand some of the functionalities available with this integration. Let us take the example to add the Twilio connector in an Action flow. The connection and authentication process would be the same whether you use an action flow or workflow.
Send Text Message
You can make use of Twilio integration to send text messages to a recipient’s phone number from your app. You can add the Message text using keywords to enable dynamic inputs.
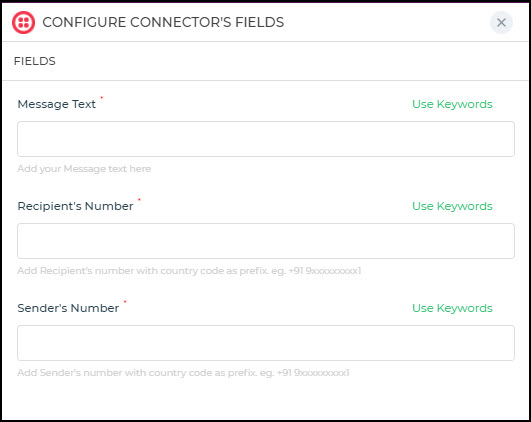
- When adding the recipient’s and sender’s numbers you need to make sure that you have added the country code as a prefix.
- The Sender’s number would be the Twilio number that would be purchased by you. This is because a Twilio phone number enables you to have a virtual presence on the physical telephony network. The Twilio number can be purchased from the Twilio Dashboard here. Your number needs to be approved by Twilio before you can use it. Till that time you can use the Trial Number that can be purchased from Twilio for testing your app. Once your business number is approved by Twilio, you can then make use of the same for your further actions to send messages to your customers.

- You can then send messages to the Verified numbers. You can see and add the caller IDs at this link here for verified numbers.

Send WhatsApp Message
You can also send WhatsApp Messages or even Media messages using the Twilio integration.
Now when you are sending WhatsApp messages using Twilio, Whatsapp needs to approve your account. After approval, your business number needs to receive a message from the end-user so that you can start sending them Whatsapp messages. If you are sending the Templated messages you can send them anytime. However, if dynamic messages are to be sent, they can be sent a maximum of 24 hours from receipt of the last message from the end-user.
Till your number is approved you can use the Twilio sandbox to test your app. You can refer to the Twilio process by Trying out the configuration of Whatsapp as mentioned here.
Once you have the Twilio configuration tested then configure the Connector to send custom messages to your users from your Apps.
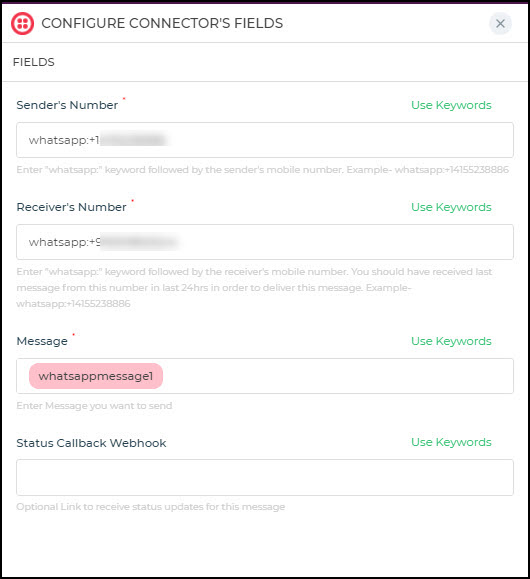
In this example below, we have the tested Sender’s number and the Recipients number and are adding the text control to send Whatsapp messages. So we would add the respective keywords in the Message field. Once done click Finish.
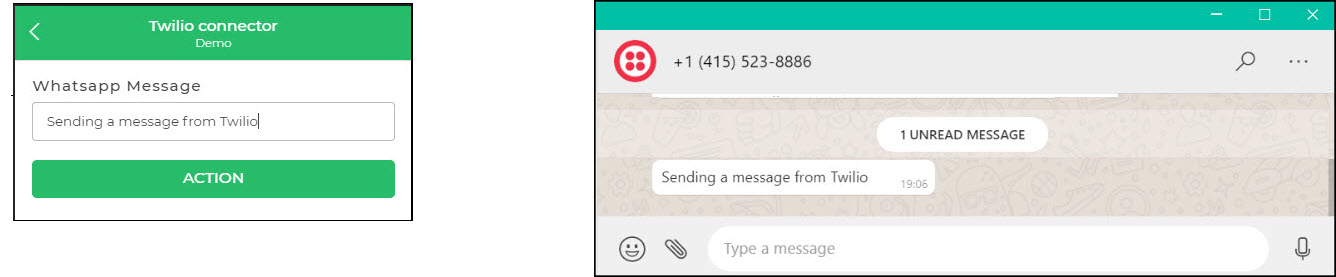
Now, whenever you take a preview or run the app you can add the respective message and it would be sent to the configured recipient.
- Make sure that you add “whatsapp: “ before adding the sender’s and recipient’s numbers.
- When any user sends your business a message you can send them a freeform outbound message within the 24-hour session/ window. Beyond that, you would have to use the pre-configured templates for outbound messaging. To further understand how to configure the opt-in functionality of WhatsApp using an open URL you can refer to this article here.

Configuring Twilio Account
Now when you are adding a new account you need to use your Twilio account authentication method. Twilio has a simple token-based authentication. You can find all your account details in the Twilio account Dashboard. When configuring the Twilio connector following are the details that you would need.
- To configure the account, under Authenticate Twilio, click +Add Account. Enter the Tag name, the Account SID and Auth Token as per your account settings.

- Add a Tag for your account name. This will be the name that would be shown in the list of accounts.
- Get API Keys: You can find the Account SID and Auth Token under the Twilio account dashboard > Developers > API Keys.
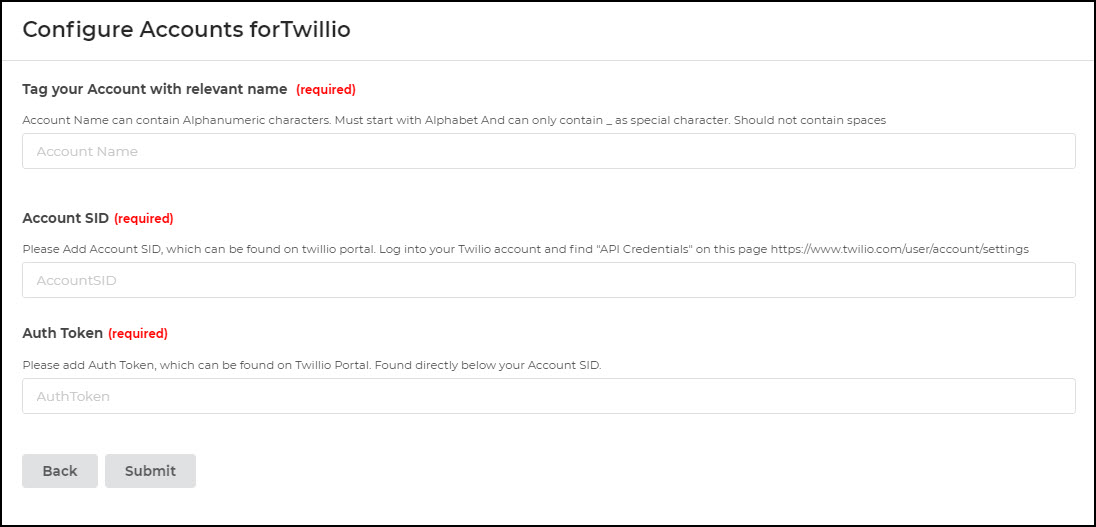
Once all the above details are added click Submit and you are ready.
Related Articles