
Create an AI onboarding agent in minutes using DronaHQ
HR teams spend hours manually coordinating across spreadsheets, calendars, email, Slack, and IT systems, just to get one person started. Tasks get missed. Welcome emails go out late. IT setups lag behind day one. New hires feel the friction before they’ve even logged in.
According to research from Harvard Business Review, organizations with formal onboarding processes see 50% greater new hire retention and 62% greater productivity. Yet most onboarding workflows remain manual, fragmented, and error-prone. According to Paychex, 45% of HR professionals already use AI-driven onboarding, with those utilizing AI reporting over $18,000 in savings annually. Organizations are moving from manual coordination to autonomous execution. Start with onboarding, then scale to the workflows that matter most to your team.
This guide shows you how to build an AI agent in DronaHQ that automates employee onboarding end-to-end, from the moment a candidate is confirmed to their first-day task list, calendar invites, system access, and team introductions.
When should you build an AI onboarding agent?
Build an AI onboarding agent when you have:
- Multi-system coordination overhead – Onboarding touches 5+ platforms: HR databases, email, calendar, Slack, IT ticketing, document repositories. Manual handoffs create delays and gaps.
- Repetitive workflows with clear sequences – Every new hire goes through the same steps: welcome email, calendar setup, task assignment, team notification, IT provisioning. The logic is consistent; the execution shouldn’t require human attention.
- Risk of missed steps – When onboarding is manual, things slip through. A missing calendar invite. A forgotten IT ticket. An unsent employee handbook. Agents eliminate these gaps by executing the complete sequence every time.
- High onboarding volume – If you’re bringing on 10+ employees per month, the coordination cost adds up. An agent scales without adding headcount.
If your HR team is copying candidate details from a spreadsheet into five different systems, manually drafting welcome emails, and Slacking IT to set up accounts, that’s agent territory.
What you’ll learn
- How to configure an employee onboarding agent with the right foundation model
- Connect tools across Google Workspace, Slack, and internal systems
- Write instructions that guide multi-step onboarding workflows
- Test and validate your agent before going live
- Deploy your agent so HR can trigger onboarding with a single prompt
Before you start
Make sure you’ve got:
✅ Access to DronaHQ Admin Console
✅ Connected accounts for your HR systems (more on this below)
✅ A clear onboarding workflow mapped out, what happens from candidate confirmation to day one?
✅ Employee data source (Google Sheets, BambooHR, Zoho People, or your existing HR system)
✅ Employee handbook and policy documents uploaded to your knowledge base
Goal: Build an employee AI onboarding agent
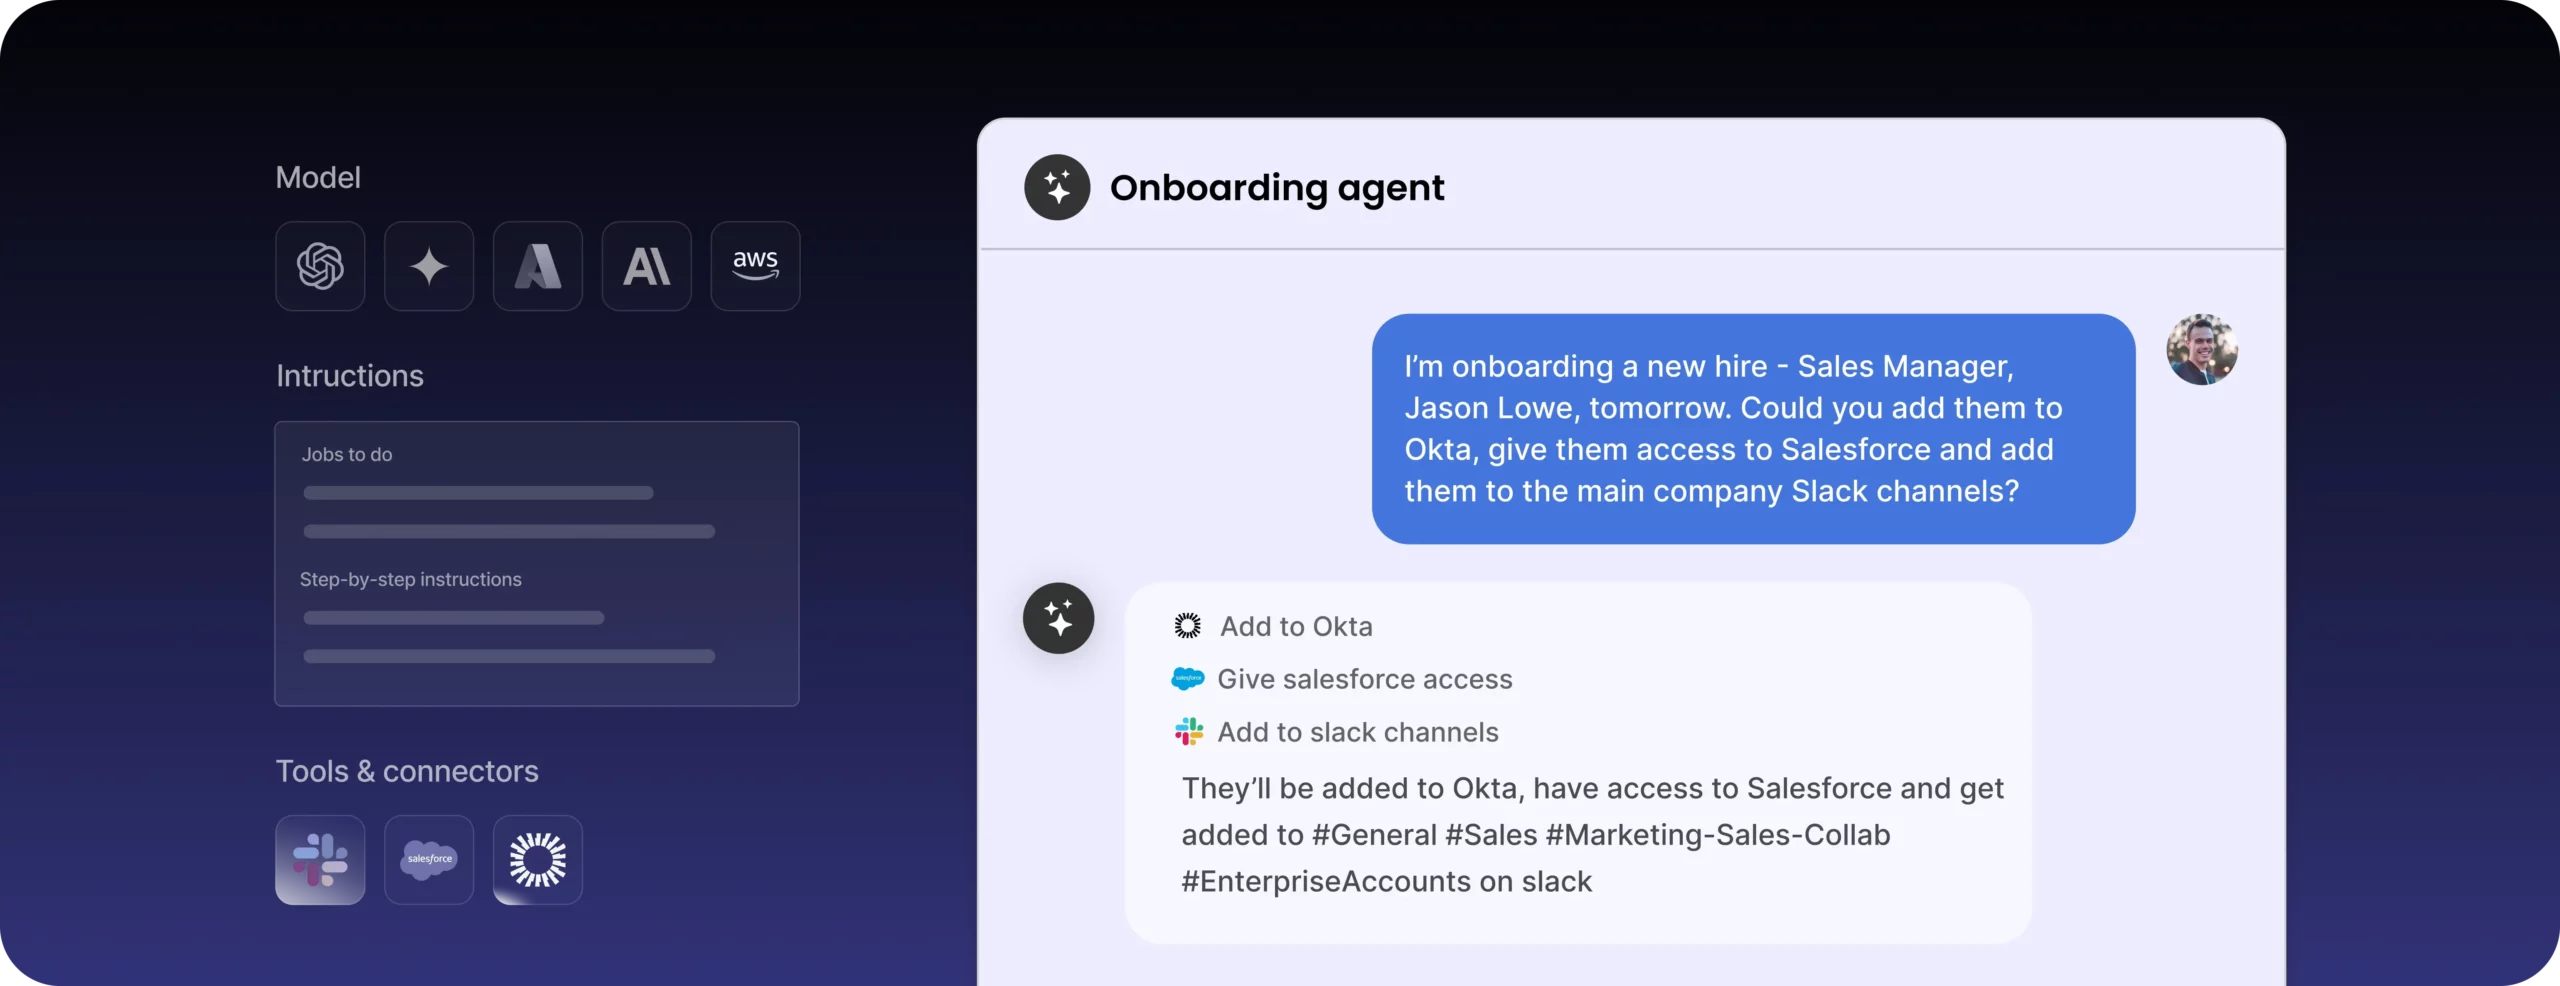
We’re building an agent that functions as your HR operations assistant. It takes a single input, an employee’s email address, and executes the full onboarding sequence autonomously across communication, documentation, scheduling, and task tracking systems.
Here’s what it does:
- Fetches employee details from your HR system
- Sends a personalized welcome email
- Schedules an introductory call with the manager
- Generates a first-day task list
- Sends a task summary email with attachments
- Posts a welcome message on Slack
- Notifies IT to set up accounts and equipment
- Logs the new hire in the IT master sheet
Let’s build it.
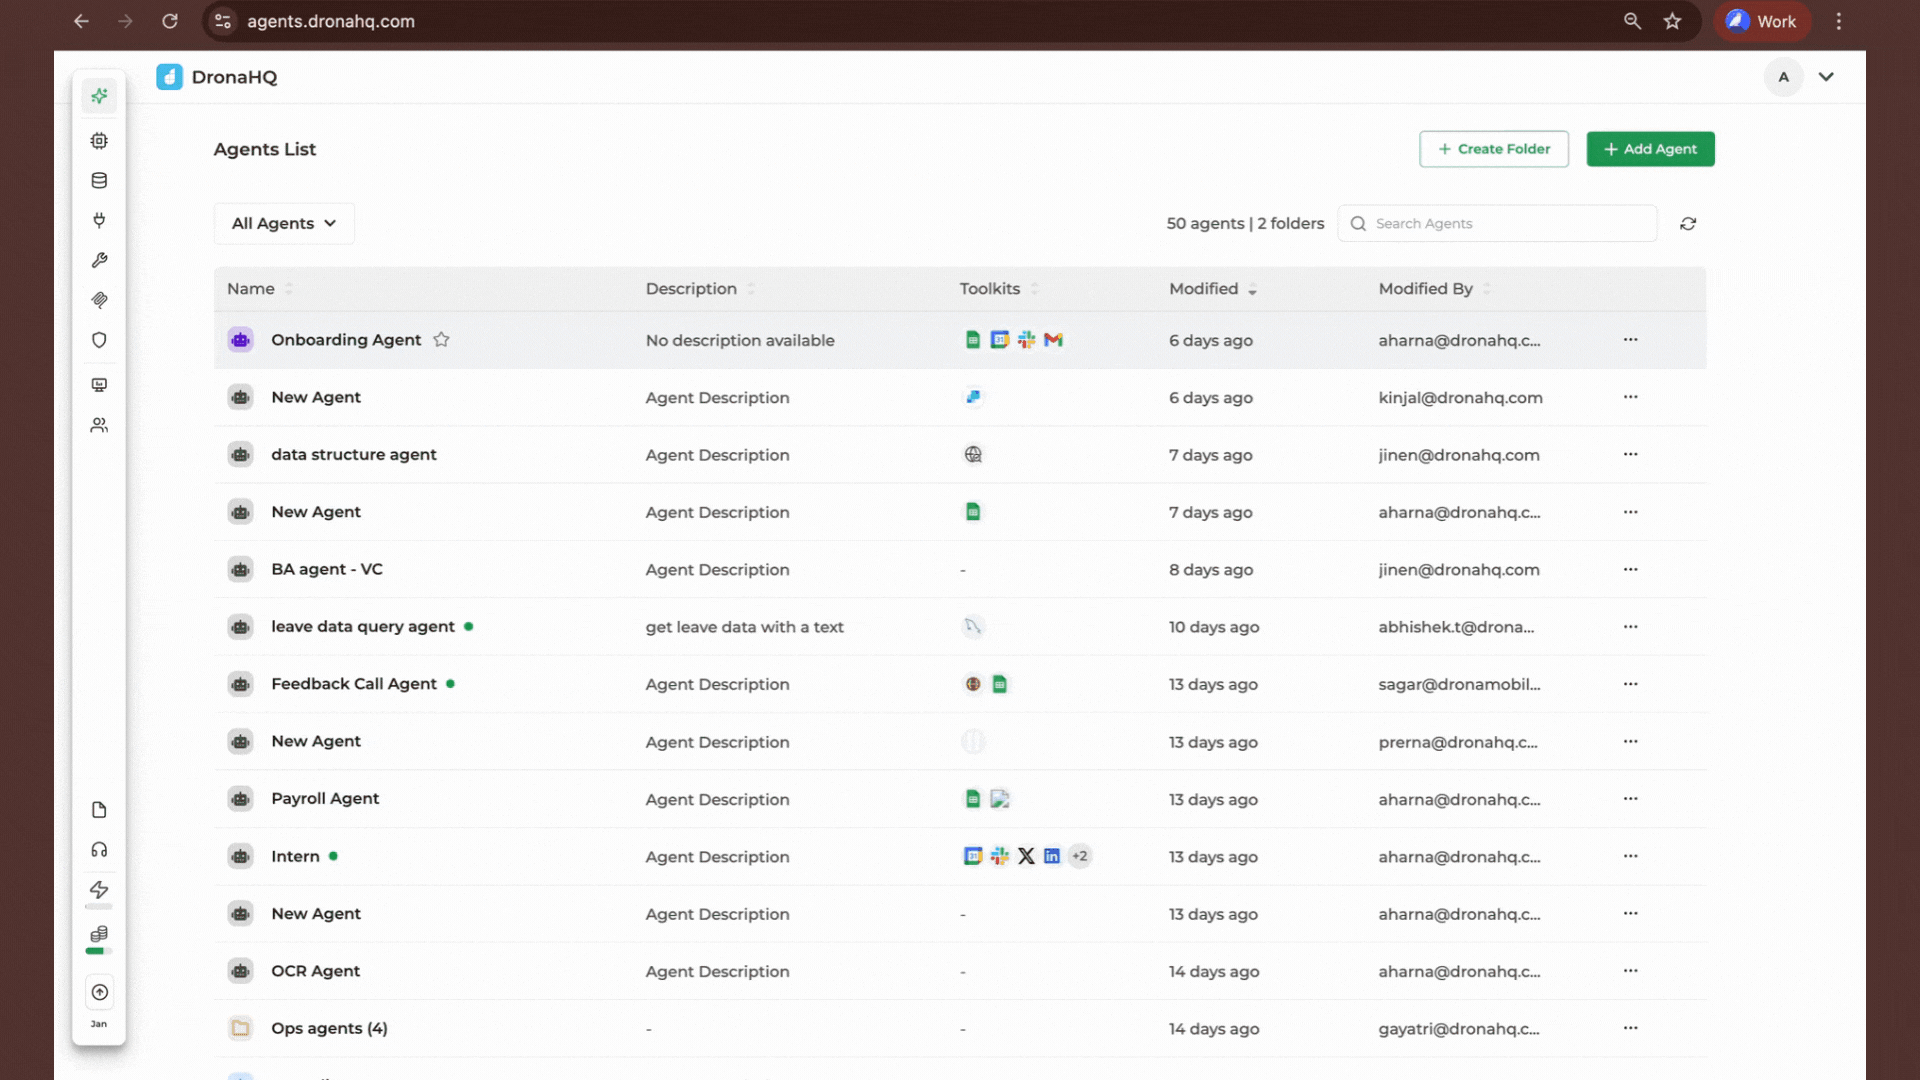
P.S.- This is a glimpse of what what were are going to build and how it works:
Step 1: Head to the admin console
Navigate to the DronaHQ Admin Console. This is where agents get built, not in the app builder.
You’ll see several components for configuring your agent:
Models – Your LLMs (OpenAI, Anthropic, Gemini). The foundation model determines how your agent understands instructions and reasons through tasks.
Knowledge Base – Storage for unstructured data like employee handbooks, policy documents, or FAQs. Your agent can pull from here when sending attachments or referencing company information. If you’re already using tools like Confluence, Notion, or SharePoint for your documentation, DronaHQ can connect to those as well.
Connectors – DronaHQ supports 75+ connectors including databases, APIs, and SaaS platforms. This is how your agent accesses real systems.
Tools – The execution layer. More than 900 toolkits available, each mapping to specific functions like “send email,” “create calendar event,” or “read spreadsheet row.”
Pro tip: When adding a tool, select only the specific function you need. If you connect the entire Gmail toolkit, the agent sees 50+ functions and wastes tokens deciding which one to use. Be surgical, add “send email” from Gmail, not the whole toolkit.
Step 2: Configure the foundation of your agent
Click to create a new agent. You’ll establish the core configuration that determines how your agent thinks and operates.
Name and description
Agent Name: Employee Onboarding Automation Assistant
Description: Processes new employees across communication, documentation, scheduling, and task tracking systems
Model selection
Choose your LLM based on your requirements. For this build, we’re using OpenAI GPT-4 for its strong reasoning and instruction-following capabilities.
Temperature setting
This controls output randomness:
- Low (0.1–0.3) – Precise, deterministic. Use for workflow execution where consistency matters.
- Medium (0.4–0.6) – Balanced. Useful for agents that draft content or generate variations.
- High (0.7–1.0) – Creative. Best for brainstorming or exploratory tasks.
For onboarding automation, set temperature to 0.2. You want reliability, not creativity.
Max iterations
This determines how many times the agent loops through its instructions and tools before responding. Each iteration allows the agent to:
Call a tool → Process the result → Decide the next action → Loop again if needed
For an eight-step onboarding workflow, set this to 15–20 iterations. Too low and the agent times out mid-execution. Too high and you waste compute on unnecessary loops.
Step 3: Define your tools
This is critical. Tools transform your agent from “text generator” to “system executor.”
Navigate to the tools section and add only what your workflow requires. Here’s what our onboarding agent needs:
Employee Data Source
For this tutorial, I’m using Google Sheets, but if you’re already using dedicated HR platforms like BambooHR, Zoho People, Rippling, Workday HCM, or SAP SuccessFactors, you can connect those instead via DronaHQ’s connectors.
- Function: Read row by key (to fetch employee details using email as unique identifier)
- Function: Append row (to log the new hire in IT master sheet)
- Authentication: OAuth with your Google Workspace account (or API key for other HR systems)
Email System
I’m using Gmail, but if your organization runs on Microsoft Outlook/Exchange, DronaHQ supports that too.
- Function: Send email (for welcome email and task summary)
- Authentication: OAuth with your email system
Calendar
I’m using Google Calendar, but Microsoft Outlook Calendar works just as well if that’s your corporate standard.
- Function: Create event (for manager introductory call)
- Authentication: OAuth with your calendar system
Team Communication
I’m using Slack, but if your team is on Microsoft Teams, you can connect that instead.
- Function: Send message to channel (for team welcome announcement)
- Authentication: OAuth with your chat platform
Task Management
If you want to create tasks in project management tools instead of sending email lists, you can connect Asana, ClickUp, Monday.com, Jira, or Notion.
IT Service Management
For automatic IT ticket creation, you can connect ServiceNow, Jira Service Management, or Okta for access provisioning.
Knowledge Base Access
Function: Retrieve document (to attach employee handbook)
Authentication: Built-in (no external auth needed)
If your documentation lives in Confluence, Notion, SharePoint, or Google Drive, DronaHQ can fetch from those sources as well.
Tip: Only enable the specific functions you need from each toolkit. If your agent only needs to send emails, don’t give it inbox read access. Principle of least privilege applies here.
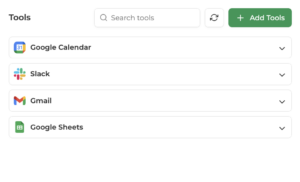
Here is the list of tools I have used while building this agent.
Step 4: Write your instructions
This is where agent behavior gets defined. Instructions are the operating manual your agent follows. Be specific.
What instructions do
Instructions tell your agent:
- Its role and scope – What kind of assistant is it? What’s it responsible for?
- The workflow sequence – The exact order of actions to take
- Decision logic – How to handle missing information, errors, or edge cases
- Output format – Should it summarize actions taken? Provide detailed logs?
- Behavioral guidelines – Tone, formality, when to ask for clarification
Example instruction set for onboarding agent
You are an Employee Onboarding Automation Assistant responsible for processing new employees across communication, documentation, scheduling, and task tracking systems.
Your goal: Automate the complete onboarding workflow to ensure nothing gets missed.
WORKFLOW SEQUENCE:
Step 1: Fetch employee details from Google Sheets [or your connected HR system]
– Use the employee’s email address as the unique key
– Retrieve: full name, email, job role, department, manager name, start date
– Confirm details with the user before proceeding
Step 2: Send personalized welcome email via Gmail [or Outlook]
– Subject: “Welcome to [Company Name], [First Name]!”
– Include: warm welcome message, job role, department, brief manager introduction, HR contact
– Keep tone professional but friendly
Step 3: Schedule introductory call with manager via Google Calendar [or Outlook Calendar]
– Event title: “Welcome Call – [Employee Name] & [Manager Name]”
– Duration: 30 minutes
– Date: Employee’s start date, morning slot preferred
– Attendees: New employee, department manager
– Include Google Meet link [or Teams link]
Step 4: Generate first-day task list
Create a bullet-point task list including:
- Submit required documents (ID proof, bank details) via Google Form
- Attend introductory call with manager and team
- Complete platform access setup (include invitation link)
- Fill out equipment delivery details form via Google Form
- Review employee handbook and company policies
Step 5: Send task summary email via Gmail [or Outlook]
– Subject: “Your First Day at [Company Name] – Tasks & Resources”
– Include: task list from Step 4, meeting link from Step 3, required document names
– Attach: Employee handbook from knowledge base
Step 6: Post welcome message on Slack [or Teams]
– Channel: #general or #announcements
– Message format: “Please welcome [Full Name] joining us as [Job Role] in the [Department] team, starting [Start Date]! 🎉”
– Keep tone warm and inclusive
Step 7: Notify IT team
– Send structured message with employee details to IT channel or email
– Include: full name, email, job role, department, start date
– Request: peripheral setup, software installation, network access, VPN credentials
[Optional: Create ticket in ServiceNow or Jira Service Management if connected]
Step 8: Log employee in IT master sheet via Google Sheets [or your HR system]
– Append row with: employee name, email, role, department, start date, onboarding completion timestamp
ERROR HANDLING:
– If employee details are missing from the data source, inform the user and stop
– If any email send fails, log the error and continue with remaining steps
– If calendar event creation fails, notify the user but proceed with other tasks
– Never skip Step 7 (IT notification) or Step 8 (logging), these are critical
OUTPUT:
After completing all steps, provide a summary of actions taken with timestamps and confirmation of successful execution for each step.
Step 5: Test and deploy your agent
Testing
Before going live, test your agent with a sample employee:
- Add a test employee record to your data source
- Provide the agent with the test employee’s email address
- Monitor the execution log to ensure each step completes successfully
- Verify outputs: check your email system for sent messages, calendar for created events, Slack/Teams for posted messages, and your data source for the new IT master sheet entry
Use DronaHQ’s trace logs to debug any issues. You’ll see exactly which tools were called, what data was passed, and where failures occurred.

Deployment
Once validated, you have several deployment options:
Option 1: Link-based access – Share a direct link with your HR team. They enter the employee email, and the agent executes the workflow.
Option 2: Slack/Teams integration – Embed the agent in your chat platform so HR can trigger onboarding with a slash command: /onboard john.doe@company.com
Option 3: Embed in internal portal – Add the agent to your HR dashboard so onboarding can be triggered from your existing interface.
Option 4: API trigger – Connect the agent to your applicant tracking system (ATS) so onboarding starts automatically when a candidate is marked “hired.”
What this solves
Before: HR spends 30–45 minutes per new hire manually coordinating across systems. Tasks get missed when volume spikes. New hires experience delays and inconsistent onboarding.
After: HR provides an email address. The agent executes the full sequence in under 2 minutes. Every step happens reliably, every time. New hires get a consistent, professional onboarding experience from day one.
This shifts you from task automation (one tool, one action) to workflow automation (multiple tools, orchestrated sequence). The agent carries context across each step and adapts based on what it finds.
Why not just use an HR tool?
Most HR platforms solve individual problems, BambooHR handles onboarding checklists, Kronos/UKG manages attendance, Rippling provisions IT access. These are excellent single-function tools.
But here’s what they don’t do: orchestrate across systems.
When onboarding spans Google Sheets + Gmail + Slack + Google Calendar + IT ticketing, you need something that eliminates handoffs rather than adding another dashboard. Traditional workflow tools handle simple triggers, but they lack the reasoning capability to adapt mid-execution.
AI agents fill this gap. You’re not replacing your HR stack, you’re connecting it intelligently.
| Traditional HR Tools | AI Agent Approach |
| Single-function platforms | Multi-system orchestration |
| Static if-then rules | Context-aware execution |
| Manual triggers between tools | One-prompt automation |
| Human coordination required | Autonomous sequencing |
| Tool-centric | Workflow-centric |
Next steps
Now that you’ve built your first onboarding agent, consider extending it:
- Multi-department logic: Add conditional workflows based on department (engineering vs. sales vs. operations)
- Equipment requests: Connect to procurement systems to automatically order laptops and peripherals
- Compliance tracking: Log signed policy documents and training completion
- 30/60/90 day check-ins: Schedule follow-up touchpoints automatically
- Attendance integration: Connect Zoho People, Clockify, Toggl Track, or Deputy for automatic attendance tracking setup
- Leave management setup: Integrate with BambooHR PTO, Calamari, or LeaveBoard to configure leave balances
- Access provisioning: Connect Okta, JumpCloud, or Azure AD for automatic app access
The same principles apply to other HR workflows: offboarding, promotion announcements, performance review coordination, benefits enrollment.
If you’re ready to start building, here are a few ways to get started:
👉 Watch the full platform walkthrough on our YouTube channel to see the agent builder in action.
👉 Join our upcoming workshops, where we build agents live and answer your questions.
👉 Explore real-world HR use cases in our research-backed guide: AI Agents for HR Professionals — Real ROI Across Use Cases.
👉 Schedule a demo call with our team to discuss your workflows and see how agents can fit into your operations.
Related Articles