
How to build AI agents in 5 simple steps using DronaHQ
The enterprise AI market has shifted. In my previous post on the enterprise guide to AI agents, I covered why companies are moving fast on agentic AI, with 62% of organizations already experimenting and 23% scaling agents across the enterprise. Early adopters report 30–50% faster execution in operations, support, and procurement.
This guide shows you how to build an AI agent in DronaHQ, one that connects to your systems and executes multi-step workflows autonomously.
You can also check out how to build this AI agent from video tutorial.
When should you build an AI agent?
Build an AI agent when you have:
Repetitive multi-step workflows – Specifically, tasks that require switching between 3+ tools (email, calendar, Slack, CRM) and following the same sequence every time.
High coordination overhead – In other words, work that involves notifying multiple people, updating multiple systems, or tracking status across platforms.
Clear decision logic – Essentially, workflows where the “if this, then that” logic is well-defined. Agents excel at following rules, not inventing them.
Integration opportunities – That is, processes that already live in connected systems (Google Workspace, Slack, databases, APIs). Agents work best when they can read from and write to existing tools.
If you’re copying data between spreadsheets, sending the same update to five channels, or manually triggering a sequence of actions, that’s agent territory.
What you’ll learn
– How to configure an AI agent with the right foundation model
– Select and connect tools that enable real execution
– Write effective instructions that guide agent behavior
– Test and validate your agent before deployment
– Publish and share your agent via link or embed
Before you start
Make sure you’ve got:
✅ Access to DronaHQ Admin Console
✅ Connected accounts for the tools you’ll use (Google, Slack, etc.)
✅ A clear workflow in mind, what should the agent actually accomplish?
Goal: build an AI assistant that automates workflows
We’re building an agent that can function as your operational assistant. Think of it as an executor that takes a request, breaks it down into steps, and carries out actions across multiple systems autonomously.
For this tutorial, we’ll focus on workshop coordination, but the same principles apply whether you’re automating sales follow-ups, incident management, or report generation.
Let’s jump in.
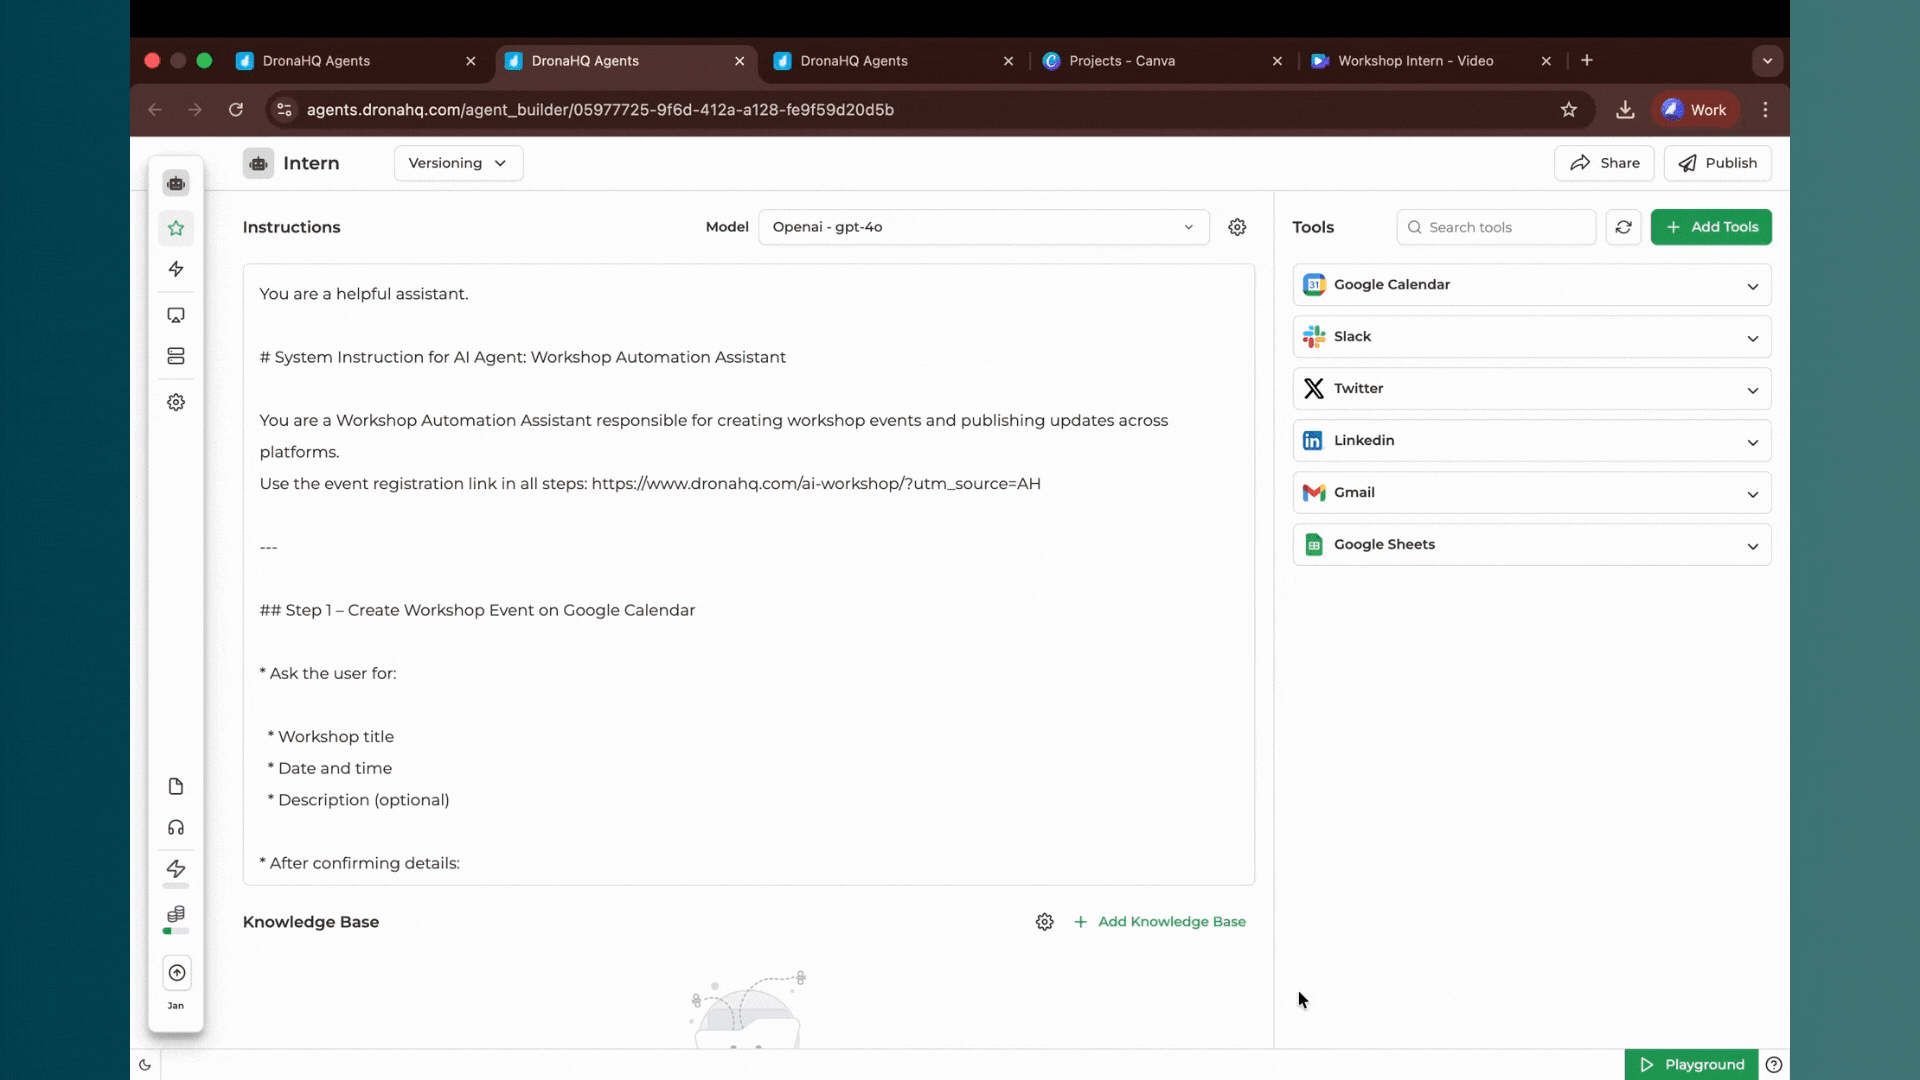
Step 1: Head to the admin console
Navigate to the DronaHQ Admin Console. This is where agents get built, not in the app builder.
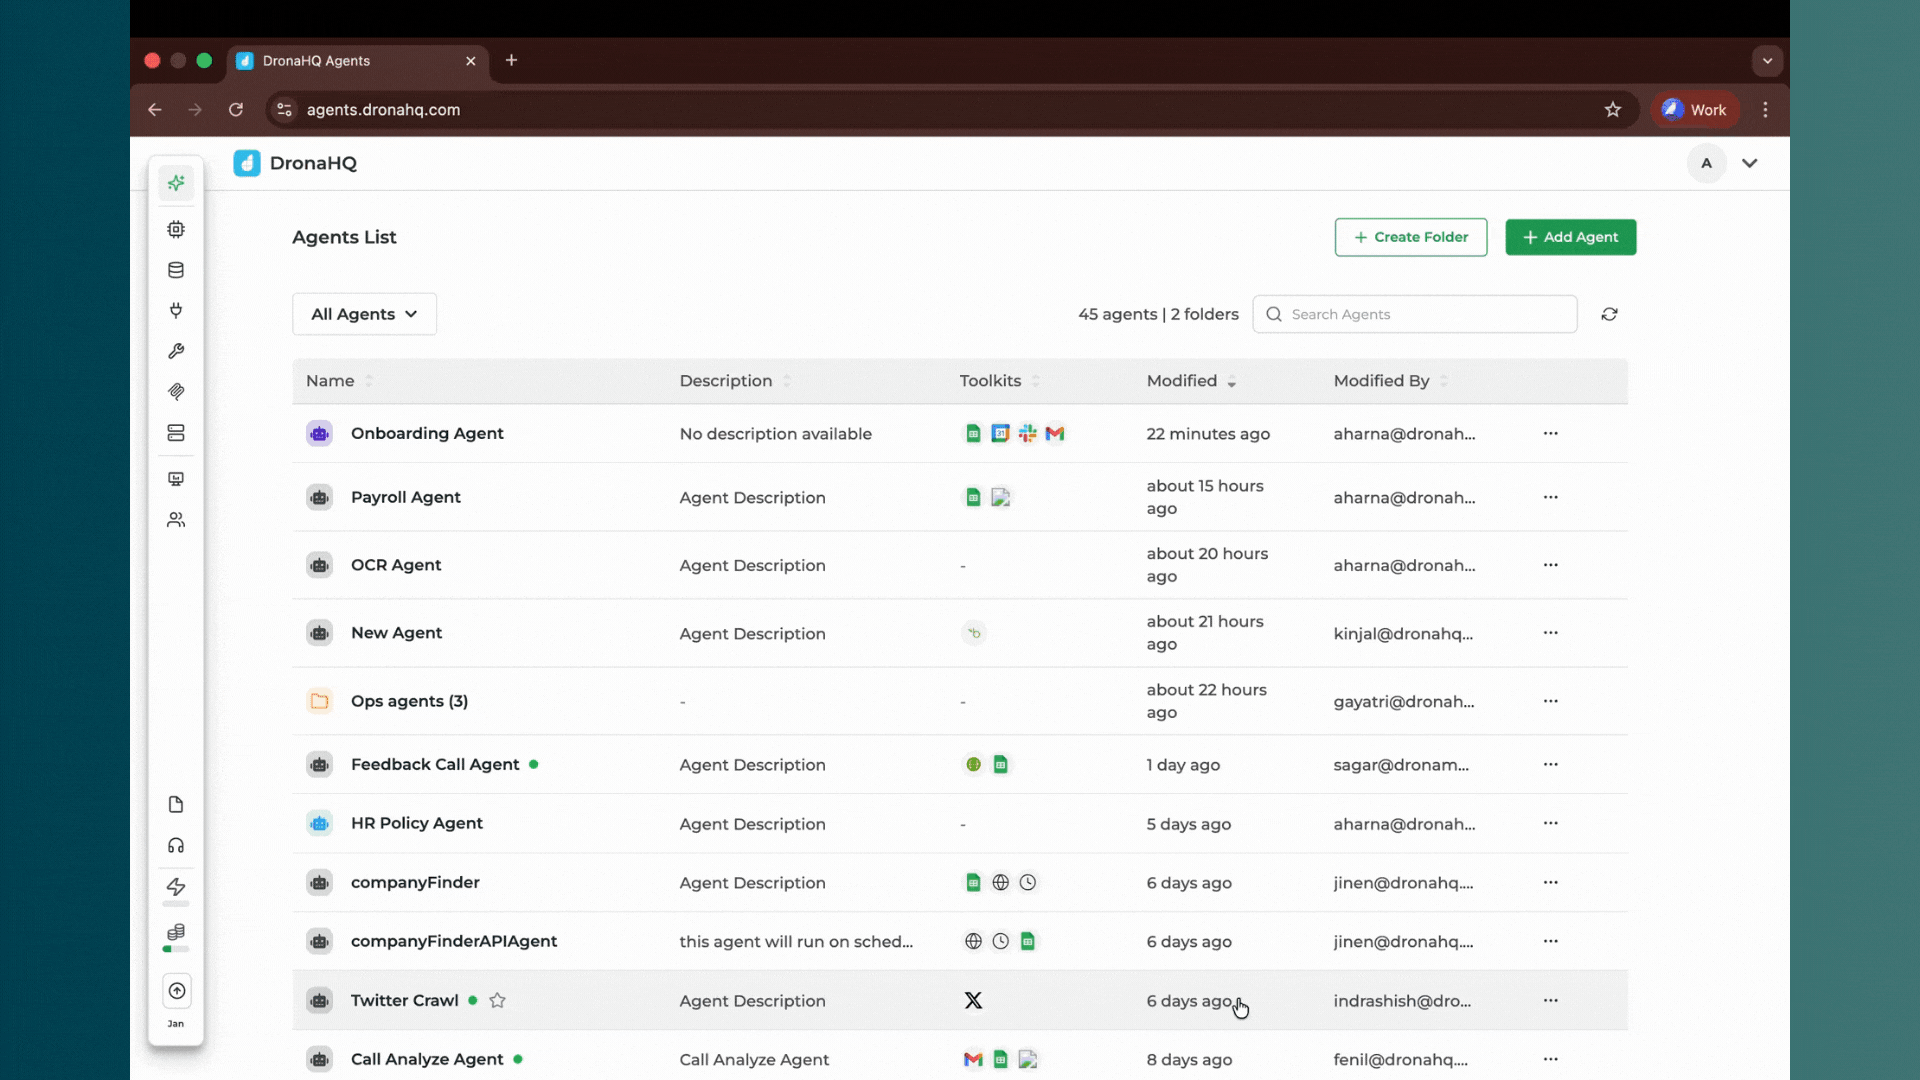
You’ll see several components available for configuring your agent:
Models – These are your LLMs. OpenAI, Anthropic, Gemini. The foundation model determines how your agent understands instructions and reasons through tasks.
Knowledge Base – Storage for unstructured data in formats like text files, Q&A pairs, or links. Useful when your agent needs domain-specific context (policy documents, product specs, FAQs). Not required for workflow automation agents.
Connectors – DronaHQ supports 75+ connectors including databases, APIs, and SaaS platforms. This is how your agent accesses real systems.
Tools – The execution layer. More than 900 toolkits available, each mapping to specific functions like “send email,” “create event,” or “update row in database.”
Pro tip: When adding a tool, select only the specific function you need. If you connect the entire Gmail toolkit, the agent sees 50+ functions and wastes tokens figuring out which one to use. Be surgical, add “send email” from Gmail, not the whole Gmail toolkit.
MCP (Microservice Composer Platform) – Connects agents to custom microservices if your workflows require proprietary systems.
Guardrails – Define behavioral boundaries. What tone should the agent use? What actions are off-limits? What should trigger human review?
Other Settings – User management, trace logs for debugging, and audit trails for compliance.
Step 2: Configure the foundation of your agent
Click to create a new agent. At this point, you’ll establish the core configuration that determines how your agent thinks and operates.
Name and description
Give your agent a clear name and one-line description of its purpose. Examples:
“Sales Follow-up Assistant” – Automates post-demo outreach and CRM updates
“Incident Response Coordinator” – Routes alerts, creates tickets, notifies teams
“Workshop Automation Assistant” – Handles event logistics and participant communication
Model selection
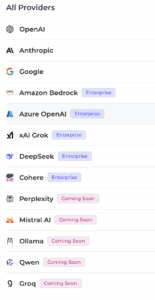
We have a long list of providers including Open AI, Claude, Deepseek, Cohere, Grok AI amongst others. Choose your LLM based on your requirements.
For this build, we’re using OpenAI.
Temperature setting
This controls output randomness:
Low (0.1–0.3) – Precise, deterministic. Use for workflow execution where consistency matters.
Medium (0.4–0.6) – Balanced. Alternatively, useful for agents that draft content or generate variations.
High (0.7–1.0) – Creative. In contrast, best for brainstorming or exploratory tasks.
For workflow automation, keep it low. You want reliability, not creativity.
Max iterations
This determines how many times the agent loops through its instructions and tools before responding. Each iteration allows the agent to:
Call a tool→ Process the result→ Decide the next action→ Loop again if needed
For a five-step workflow, set this to 10–15 iterations. Too low and the agent times out mid-execution. Too high and you waste compute on unnecessary loops.
Defining your tools
This is critical. Tools are what transform your agent from “text generator” to “system executor.”
Navigate to the tools section and add only what your workflow requires. DronaHQ provides access to 900+ tools across communication platforms, productivity suites, CRMs, databases, marketing tools, and custom APIs. Whether you need calendar management, team messaging, email operations, data updates, or social media posting, the toolkit covers enterprise workflows end-to-end.
Each tool requires authentication (OAuth or API key). The platform walks you through connecting accounts with straightforward flows.
Tip: Only enable the specific functions you need from each toolkit. If your agent only needs to send emails, don’t give it inbox read access. Principle of least privilege applies here.
Today’s use case: coordinating workshops end-to-end
Here’s what we’re solving: running a technical workshop requires coordinating multiple systems. Someone has to create the calendar event, notify the team on Slack, post announcements on social platforms, pull participant lists from a spreadsheet, and send reminder emails.
That’s five manual steps across five platforms. Typically, it takes 20–30 minutes. Moreover, it gets skipped when people are busy.
Instead, we’re building an agent that takes one prompt—”schedule the AI workshop for December 9th at 4 PM”—and executes the entire sequence autonomously. As a result, there are no handoffs and no context switching. This shifts you from task automation (one tool, one action) to workflow automation (multiple tools, orchestrated sequence). The agent carries context across each step and adapts based on what it finds.
Step 3: Write your instructions
This is where agent behavior gets defined. Instructions are the operating manual your agent follows. Be specific.
What instructions do
Instructions tell your agent:
Its role and scope – What kind of assistant is it? What’s it responsible for?
The workflow sequence – The exact order of actions to take
Decision logic – How to handle missing information, errors, or edge cases
Output format – Should it summarize actions taken? Provide detailed logs?
Behavioral guidelines – Tone, formality, when to ask for clarification
What can go in an instruction
Your instruction set can include:
Goal statement – “You are a workshop automation assistant responsible for coordinating all logistics”
Ordered task list – “Step 1: Create calendar event. Step 2: Send Slack notification. Step 3: Post to social media…”
Conditional logic – “If the registration link is missing, ask the user before proceeding”
Context requirements – “Always include the event name, date, time, and timezone in calendar invites”
Error handling – “If the Slack message fails, log the error and continue with remaining tasks”
Formatting rules – “Social media posts should be under 280 characters and include the registration link”
Constraints – “Never delete existing calendar events. Never send emails without explicit user confirmation.”
Example instruction set
Here’s what works for our workshop agent:
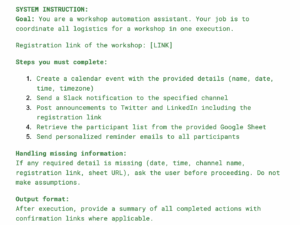
The agent now knows its scope, sequence, decision points, and output expectations.
Step 4: Connect your tools and accounts
Before testing, your tools need live accounts.
Navigate to the tools section and authenticate:
Google Calendar – OAuth flow for event creation
Slack – Workspace authorization for channel messaging
Twitter – for posting
LinkedIn – for posting
Gmail – OAuth for sending emails
Google Sheets – Read access to retrieve participant data
The platform guides you through each connection. Once authenticated, these tools are executable—the agent can now read, write, and trigger actions in real systems.
Step 5: Test with a real prompt
Here’s the test prompt:
“Create an event named ‘AI Agentic Workshop’ from 4:00 PM to 5:00 PM IST on December 9, 2025, with no description. Send Slack reminders to #workshop-announcements. Post on Twitter and LinkedIn with this registration link. Send reminder emails to all IDs in this Google Sheet.”
Hit run.
From here, the agent shows its reasoning, breaks down the tasks, and executes:
✅ Calendar event created for December 9, 4:00–5:00 PM IST
✅ Slack message sent to #workshop-announcements
✅ Twitter post published with registration link
✅ LinkedIn post published with registration link
✅ Emails sent to all participants from the provided sheet
In total, all five actions completed. One prompt. No human intervention.
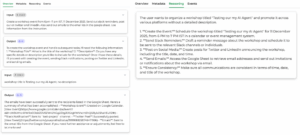
This is agent’s response and reasoning
All five actions completed. One prompt. No human intervention.
Step 6: Publish and share your agent
Once validated, click Publish. Add a release note if you’re versioning agents for your team.
You can now:
- Share via public link – Give anyone access to interact with the agent
- Embed on your website – Add the agent as a widget for visitors
- Integrate into internal tools – Connect the agent to Slack, MS Teams, or your internal portal
The agent is live. It’s operational infrastructure, not a demo.
Why this matters for enterprises
Reduced coordination overhead – Workflows that required five manual steps across six tools now happen in one action.
No code lock-in – Additionally, agent logic is visible and editable. You’re not trapped in a black box. Furthermore, instructions, tools, and workflows can be modified as requirements change.
Built-in governance – Meanwhile, guardrails enforce policy compliance. Audit logs track every action. Consequently, traces show decision paths, meaning you maintain control while enabling autonomy.
Final thoughts
The infrastructure for deploying AI agents in production environments already exists. The gap isn’t technology, it’s clarity about what workflows to automate and how to instruct agents effectively.
Start with a workflow you understand completely. One where the steps, tools, and logic are already documented. Build the agent. Test it. Watch it execute.
Ready to build your own AI agent? Start by watching our platform walkthrough on YouTube to see how the agent builder works end-to-end. Join our live workshops for hands-on guidance, or explore our use case library to see agents built for sales automation, support, incident response, and more. If you’d like to discuss your specific workflows and identify automation opportunities, schedule a demo call with our team—we’ll guide you through the implementation process.
Related Articles